
These images have been scanned from Bill Blannin's photo albums, the codes refer to Bill's albums. The images are all © copyright by the photographers and have been posted for non-commercial use only.
Link to the Rail Heritage Image Library.
Image: [13 tonne weigh scale] 10/85. (Code C28 B). Bill Blannin Collection
Image: [6 ton bin] 961, 7/96. (Code C18). Bill Blannin Collection
Image: [Bowen Hills suburban train] 104, 1996. (Code B). Bill Blannin Collection
Image: [Bowen Hills suburban train] 207 Hellensvale, 1996. (Code C15 B). Bill Blannin Collection
Image: [Bowen Hills suburban train] 207 Hellensvale, 1996. (Code C15 B). Bill Blannin Collection
Image: [Container flat] Yeerongpily. (Code C29 B). Bill Blannin Collection
Image: [Flooding], 7/88. (Code B25 C). Bill Blannin Collection
Image: [Flooding], 7/88. (Code B25 C). Bill Blannin Collection
Image: [Navvy Equipment] 1988, C29 B). Bill Blannin Collection
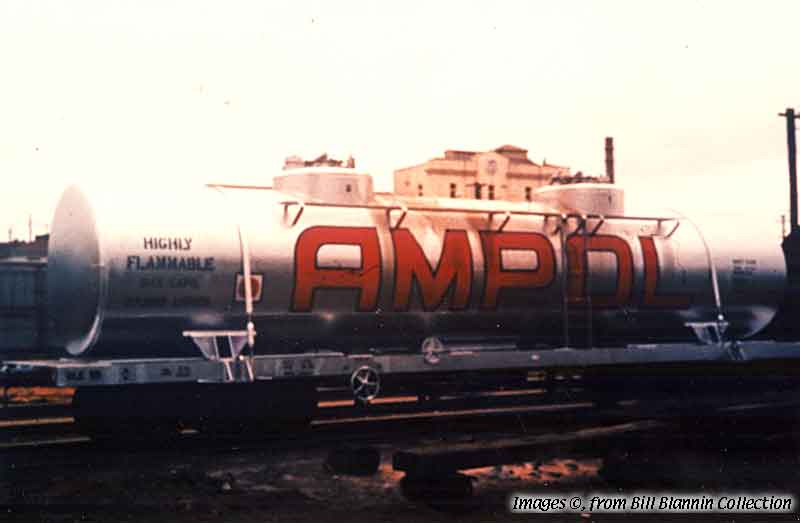
Image: [OLE 15] Ampol, Toowoomba. (Code C29 B). Bill Blannin Collection
Image: [QR Refridgerated Container]. (Code C30 B). Bill Blannin Collection
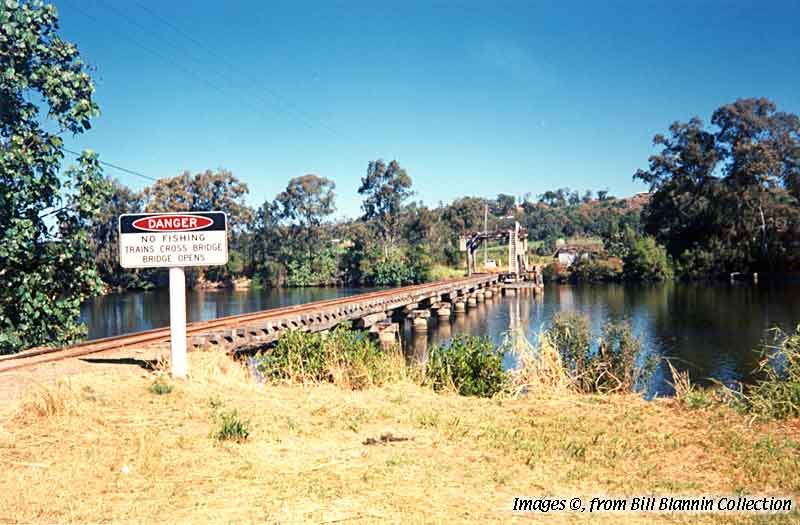
Image: [River Depot Bridge], Moreton Mill, 18/7/96. (Code C17). Bill Blannin Collection
Image: [Rotary bin dump], Isis Central Mill, 1994. (Code B96). Bill Blannin Collection
Image: [Rotary bin dump], Isis Central Mill. (Code B96). Bill Blannin Collection
Image: [Speed-E-Gas], Mayne. (Code C4 B). Bill Blannin Collection
Image: [Station platform and scales] 10/85. (Code C28 B). Bill Blannin Collection
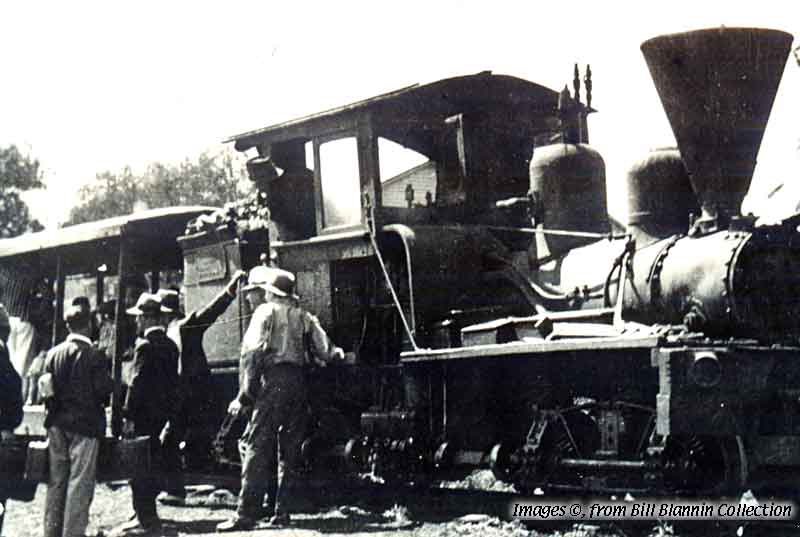
Image: [Steam locomotive with tender]. (Code C4 B). Bill Blannin Collection
Image: [Tank wagon], New Farm. (Code B25 C). Bill Blannin Collection
Image: [Tank wagon], New Farm. (Code B25 C). Bill Blannin Collection
Image: [Tank wagon], New Farm. (Code B25 C). Bill Blannin Collection
Image: [Tank wagon]. (Code New Farm. (Code B25 C). Bill Blannin Collection
Image: [Timber loading crane] 10/85. (Code C28 B). Bill Blannin Collection
Image: [Trestle] 10/85. (Code C28 B). Bill Blannin Collection
Image: [Turntable], 1995. (Code B). Bill Blannin Collection
Image: 05 + RM 55, Fruit Grove, 27/4/86. (Code C28 B). Bill Blannin Collection
Image: 1009, SunSteam trip to Ebenezer. (Code B RG). Bill Blannin Collection
Image: 1297, Rockhampton. (Code C28 B). Bill Blannin Collection
Image: 1301. (Code C23 B). Bill Blannin Collection
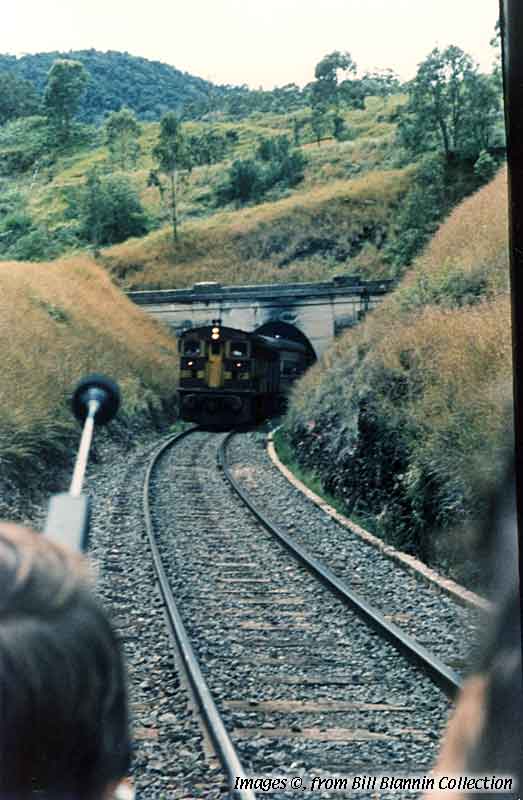
Image: 1313, Eum Range. (Code C20). Bill Blannin Collection
Image: 1452, Gympie Mail, Gympie, 1981. (Code C32 B). Bill Blannin Collection
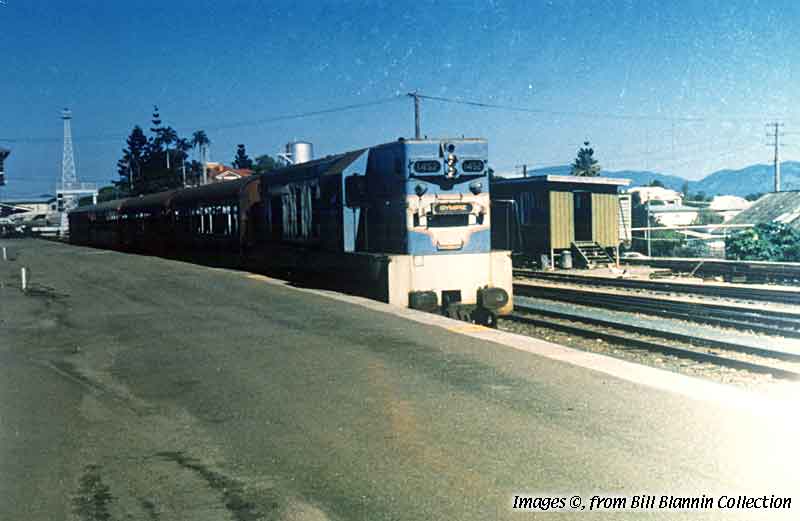
Image: 1463, North Arm. (Code C28 R). Bill Blannin Collection
Image: 1464, Normanby. (Code C4 B). Bill Blannin Collection
Image: 1475, Sandgate, 1975 (now TranzRail). (Code C31 B). Bill Blannin Collection
Image: 1478, Caboolture, . (Code C23 B). Bill Blannin Collection
Image: 1481. (Code C32 B). Bill Blannin Collection
Image: 1486, Roma Street. (Code C27 B). Bill Blannin Collection
Image: 1506, Caboolture. (Code C20). Bill Blannin Collection
Image: 1530, Yeerongpilly, 1977. (Code C31 B). Bill Blannin Collection
Image: 1614, Ferny Grove, 13/7/85. (Code C19 B). Bill Blannin Collection
Image: 1614, Ferny Grove, 13/7/85. (Code C19 B). Bill Blannin Collection
Image: 1734, Mayne, Wunderlick Train, 1975. (Code C26 B). Bill Blannin Collection
Image: 1751, Toowoomba. (Code C28 B). Bill Blannin Collection
Image: 1996. (Code 18 7 C17). Bill Blannin Collection
Image: 2000-209, North Arm. (Code C29 B). Bill Blannin Collection
Image: 2028, Caboolture. (Code C20). Bill Blannin Collection
Image: 20587. (Code C32 B). Bill Blannin Collection
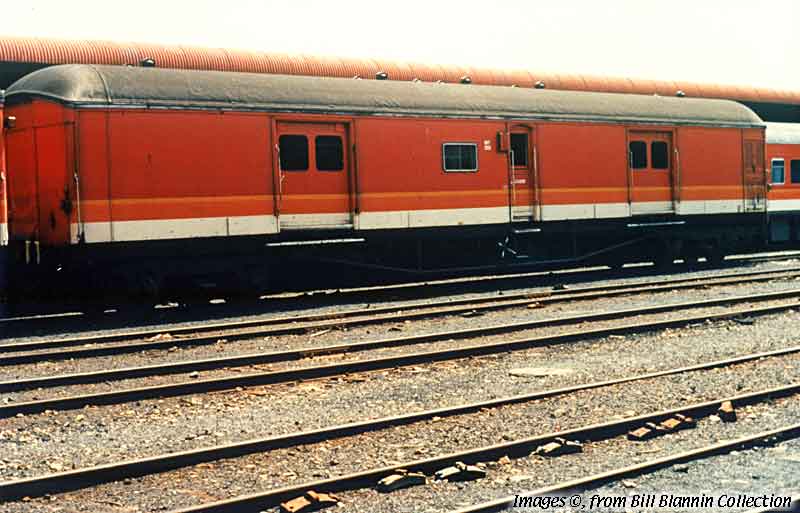
Image: 2106 (carriage), South Brisbane. (Code C30). Bill Blannin Collection
Image: 23nn, RM23, Mayne 1973. (Code C34 B). Bill Blannin Collection
Image: 2499, Roma Street, . (Code C31 B). Bill Blannin Collection
Image: 2522 (Parcels), South Brisbane. (Code C30 B). Bill Blannin Collection
Image: 26 C19 B). Bill Blannin Collection
Image: 264 Power car. (Code C4 B). Bill Blannin Collection
Image: 28 C19 B). Bill Blannin Collection
Image: 3801 (drivers)). Bill Blannin Collection
Image: 3801 (front of loco with 50th Anniversary signage), 1993). Bill Blannin Collection
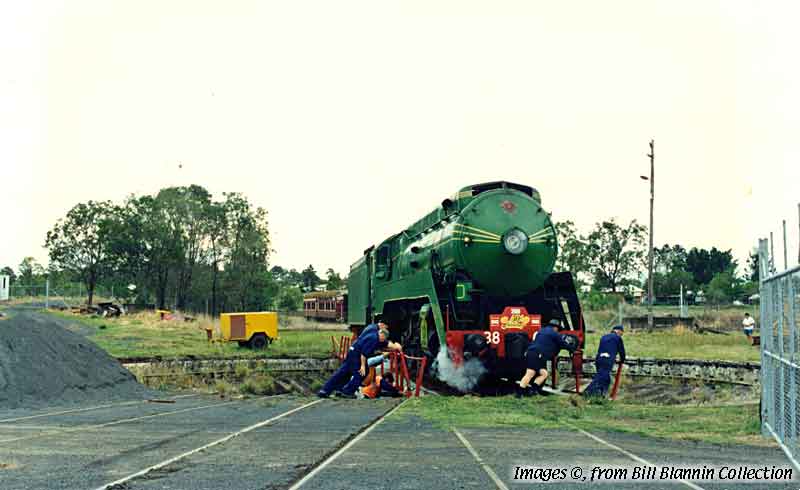
Image: 3801 Casino (on the turntable), 1993. (Code B). Bill Blannin Collection
Image: 3801 Roma Street, 1993. (Code B). Bill Blannin Collection
Image: 3801, 1993). Bill Blannin Collection
Image: 3909, 1996. (Code 18 7 C17). Bill Blannin Collection
Image: 4418, Boarder Loop, 26/11/83. (Code C31 B). Bill Blannin Collection
Image: 52 + RM 55, 8/3/86. (Code C31 B). Bill Blannin Collection
Image: A10 No 6, Redbank Museum, Bill Blannin. (Code C19 B). Bill Blannin Collection
Image: A10 No 6, Redbank Museum. (Code C4 B). Bill Blannin Collection
Image: ABG 18753. (Code C31 B). Bill Blannin Collection
Image: Allen Mc. (Code C7 B). Bill Blannin Collection
Image: ALY 33492 [Poison wagon], 10/85. (Code C28 B). Bill Blannin Collection
Image: Aramore. (Code C31 B). Bill Blannin Collection
Image: B100). Bill Blannin Collection
Image: B100). Bill Blannin Collection
Image: B13 K5 (4-6-0 Dubs 1715 of 1883), Beaudesert. (Code B100). Bill Blannin Collection
Image: B15 290, Redbank Museum. (Code C4 B). Bill Blannin Collection
Image: Baldwin 751 (1975), 752, Millaquin Mill, Bundaberg, 1996. (Code B). Bill Blannin Collection
Image: Baldwin 'Bli Bli', Nambour, 7/96. (Code C18). Bill Blannin Collection
Image: Baldwin No 10, Isis Central Mill, 1994. (Code B96). Bill Blannin Collection
Image: Baldwin, ComEng 'Dunethin', Nambour, 7/96. (Code C18). Bill Blannin Collection
Image: Ballandean, 1/96. (Code C12 E). Bill Blannin Collection
Image: Banyo. (Code C30 B). Bill Blannin Collection
Image: BB18 1/4 1089, Caboolture, 25/11/78. (Code First steam over Merivale Bridge. (Code B100). Bill Blannin Collection
Image: Bethania, 27/4/85. (Code C28 B). Bill Blannin Collection
Image: 'Bli Bli', Moreton Mill, Nambour. (Code B54). Bill Blannin Collection
Image: 'BliBli' in park. (Code B98). Bill Blannin Collection
Image: Brake van, Isis Central Mill, 1992. (Code B97). Bill Blannin Collection
Image: Brake van, Isis Central Mill, 1994. (Code B97). Bill Blannin Collection
Image: Broadmeadow. (Code C19). Bill Blannin Collection
Image: Brookstead, 21/1/84. (Code 310). Bill Blannin Collection
Image: Burpengary. (Code C27 B). Bill Blannin Collection
Image: Byron Bay, NSW. (Code 9/96. (Code C22). Bill Blannin Collection
Image: C13, Baldwin 2-8-0 (1879) No 118, Ex QR No 42, Ex-Bingera. (Code B92). Bill Blannin Collection
Image: C17 974, BB 18 !/4 1079, Troop Train, Telegraph Road, 1995. (Code C1). Bill Blannin Collection
Image: C30 B). Bill Blannin Collection
Image: C32 B). Bill Blannin Collection
Image: C4 B). Bill Blannin Collection
Image: Caboolture. (Code C20). Bill Blannin Collection
Image: Caboolture. (Code C20). Bill Blannin Collection
Image: Caboolture. (Code C20). Bill Blannin Collection
Image: Caboolture. (Code C20). Bill Blannin Collection
Image: Clapham. (Code C20). Bill Blannin Collection
Image: Climax, Laheys Canungra. (Code B92). Bill Blannin Collection
Image: Clyde 'Moreton', Moreton Mill, 7/96. (Code C18). Bill Blannin Collection
Image: Clyde No 8, Cordalba, Isis Central Mill, 1992. (Code B96). Bill Blannin Collection
Image: ComEng 'Jamaica', Moreton Mill, 7/96. (Code C17). Bill Blannin Collection
Image: Comeng, Bundaberg, 1996. (Code B). Bill Blannin Collection
Image: Coolum (0-6-0T), Howard Street, Nambour. (Code C29 B). Bill Blannin Collection
Image: Coominya station. (Code C79 B). Bill Blannin Collection
Image: Coominya, 16/7/85. (Code C19 B). Bill Blannin Collection
Image: Cooroy. (Code C4 B). Bill Blannin Collection
Image: Cottonvale Station, 1/96. (Code C8 A). Bill Blannin Collection
Image: CSV 1053, 10/85. (Code C28 B). Bill Blannin Collection
Image: CV 36, Underwater Inspector's car, Mayne. (Code C19). Bill Blannin Collection
Image: CW170, Coominya. (Code C32 B). Bill Blannin Collection
Image: CWA building, ANGRMS, Woodford, 1996. (Code C21). Bill Blannin Collection
Image: Dakabin. (Code C27 B). Bill Blannin Collection
Image: Dalby. (Code C31 B). Bill Blannin Collection
Image: DD17 1051, Redbank Museum. (Code C4 B). Bill Blannin Collection
Image: DD17 1051, Redbank Museum. (Code C4 B). Bill Blannin Collection
Image: DH 25, Gympie. (Code C27 B). Bill Blannin Collection
Image: DH 55, Mayne.C7). Bill Blannin Collection
Image: DH, Cordalba, Isis Central Mill, 1992. (Code B96). Bill Blannin Collection
Image: DH10, 1203-29 set, Nanchock Siding, Ipswich. (Code C32 B). Bill Blannin Collection
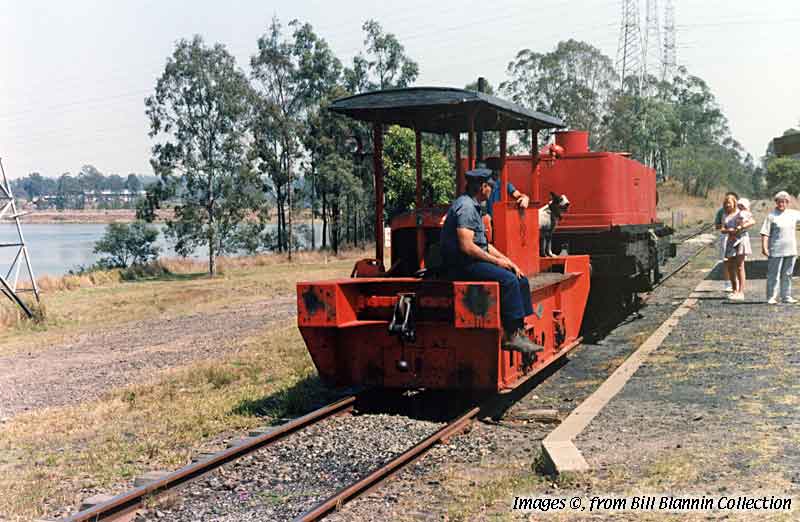
Image: Dinasaur Park, Buderim: 2' gauge rail motor, c 1970. (Code Holden motor, automatic transmission locked into forward and reverse only). Bill Blannin Collection
Image: Dirandbandi Mail, Toowoomba. (Code C32 B). Bill Blannin Collection
Image: Dreamworld. (Code B). Bill Blannin Collection
Image: Eum Range. (Code C20). Bill Blannin Collection
Image: Ex-QR 4010 No 10 1866, Hyne & Son, Fraser Island, to Fairymead Mill 1922. (Code Ex-Dept Forestry PHO). Bill Blannin Collection
Image: FCZY 46814, 1995. (Code 6 RG). Bill Blannin Collection
Image: FGW 9379. (Code C19). Bill Blannin Collection
Image: Foden 1917, Beaudesert, Tabooba. (Code B100). Bill Blannin Collection
Image: Fordson Rail Tractors, ANGRMS, Woodford, 1996. (Code C21). Bill Blannin Collection
Image: Gemco (1965), ANGRMS, Woodford. (Code C26). Bill Blannin Collection
Image: Germany (Orenstein & Koppel, 0-4-0T 6805 of 1914), Bundaberg Garden Railway, 1994. (Code B89). Bill Blannin Collection
Image: Germany (Orenstein & Koppel, 0-4-0T 6805 of 1914), Bundaberg Garden Railway, 1994. (Code B89). Bill Blannin Collection
Image: Germany (Orenstein & Koppel, 0-4-0T 6805 of 1914), Bundaberg Garden Railway, 1994. (Code B89). Bill Blannin Collection
Image: Gympie with 1901. (Code C27 B). Bill Blannin Collection
Image: Gympie. (Code B35 C). Bill Blannin Collection
Image: Gympie. (Code C20). Bill Blannin Collection
Image: H, Mayne. (Code C4 B). Bill Blannin Collection
Image: Harristown. (Code C20). Bill Blannin Collection
Image: Henschel loco (29583 of 1956, 2' 6", Tony Gilbert) at Dalby Historical Museum, one of three imported from Thailand (710mm gauge), 26/1/00). Bill Blannin Collection
Image: Henschel loco at Dalby Historical Museum, one of three imported from Thailand (710mm gauge), 26/1/00). Bill Blannin Collection
Image: Homles. (Code C29 B). Bill Blannin Collection
Image: Hunslet No 306 (1218 of 1916), Gin Gin, 1958. (Code B92). Bill Blannin Collection
Image: Inter Transtar [Loading empty bins], Isis Central Mill, 1994. (Code B96). Bill Blannin Collection
Image: Isis Central Mill, 1994. (Code B96). Bill Blannin Collection
Image: Isis Central Mill, 1994. (Code B97). Bill Blannin Collection
Image: Jenbach 'Netherdale' (1954), Gemco (1965), Ruston (No 5, ex-Condong Mill), ANGRMS, Woodford. (Code C26). Bill Blannin Collection
Image: Jondaryn Station, Qld, 1/96. (Code C9 B). Bill Blannin Collection
Image: Koppel 1896, Gin Gin, Bunyip. (Code B). Bill Blannin Collection
Image: Krauss 0-6-0T (4687 of 1900), Moreton, Nambour. (Code C29 B). Bill Blannin Collection
Image: KSA 31629, Mayne. (Code C7). Bill Blannin Collection
Image: KSA Mayne. (Code C4 B). Bill Blannin Collection
Image: KSA, Mayne. (Code C7 B). Bill Blannin Collection
Image: L1187. (Code C20). Bill Blannin Collection
Image: Linville, 10/3/01). Bill Blannin Collection
Image: Linville. (Code C32 B). Bill Blannin Collection
Image: LNER 4472, 3801, 1984. (Code C29 B). Bill Blannin Collection
Image: Lockyear. (Code C31 B). Bill Blannin Collection
Image: LTC 1848, 1995. (Code B 6 RG). Bill Blannin Collection
Image: Malcolm Moore (ex-Army), ANGRMS, Woodford, 1996. (Code C21). Bill Blannin Collection
Image: Malcolm Moore 1069. (Code C29 B). Bill Blannin Collection
Image: Malcolm Moore 'Joe', Nambour, 7/96. (Code C18). Bill Blannin Collection
Image: Malu Station, 1/96. (Code C9 B). Bill Blannin Collection
Image: Malu Station, Qld, 1/96. (Code C9 B). Bill Blannin Collection
Image: 'Maroochy' (0-6-2T 1078 of 1924), HC ex-Moreton Mill. (Code C14 B). Bill Blannin Collection
Image: Mayne sand. (Code C4 B). Bill Blannin Collection
Image: Mayne sand. (Code C7 B). Bill Blannin Collection
Image: Mayne, 1975. (Code E7 B). Bill Blannin Collection
Image: Mayne, bulk sand. (Code C7 B). Bill Blannin Collection
Image: Mayne. (Code B 16). Bill Blannin Collection
Image: Mayne. (Code C19). Bill Blannin Collection
Image: Mayne. (Code C20). Bill Blannin Collection
Image: Mayne. (Code C4 B). Bill Blannin Collection
Image: Mayne. (Code C4 B). Bill Blannin Collection
Image: Mayne. (Code C4 B). Bill Blannin Collection
Image: Mayne. (Code C4 B). Bill Blannin Collection
Image: Mayne. (Code C4 B). Bill Blannin Collection
Image: Mayne. (Code C7 B). Bill Blannin Collection
Image: Mayne. (Code C7 B). Bill Blannin Collection
Image: 'Melbourne', ANGRMS, Woodford, 1996. (Code B). Bill Blannin Collection
Image: MMA5, Mayne, 1974. (Code C7 B). Bill Blannin Collection
Image: MMB 37 Tamper, Rockhampton, 9/96. (Code R9 B). Bill Blannin Collection
Image: MOOS 1958 [BFC]. (Code B48). Bill Blannin Collection
Image: 'Moreton' with tourist train). Bill Blannin Collection
Image: MPC-W 1917, Mayne, 1996. (Code B). Bill Blannin Collection
Image: N0 11, Isis Central Mill, 1994. (Code B97). Bill Blannin Collection
Image: NA 18905, Gympie. (Code C27 B). Bill Blannin Collection
Image: Narrangba. (Code C27 B). Bill Blannin Collection
Image: New Brunswick Street Station. (Code C7 B). Bill Blannin Collection
Image: New Zealand: 7 1/4" scale Great Western No 412216. (Code C14 B). Bill Blannin Collection
Image: New Zealand: Heisler (1904), Stearns, Ongarue, 1966. (Code B). Bill Blannin Collection
Image: New Zealand: Heisler (1904), Stearns, Ongarue, 1966. (Code B). Bill Blannin Collection
Image: New Zealand: Shantytown. (Code C14 B). Bill Blannin Collection
Image: Newstead. (Code ). Bill Blannin Collection
Image: No 1, ex-DH20, Isis Central Mill, 1994. (Code B96). Bill Blannin Collection
Image: No 1, ex-DH20, Isis Central Mill., Childers, 1994. (Code B97). Bill Blannin Collection
Image: No 10, Isis Central Mill, 1990. (Code B96). Bill Blannin Collection
Image: No 10, Isis Central Mill, 1990. (Code B96). Bill Blannin Collection
Image: No 11, Isis Central Mill, Childers, 1004. (Code B97). Bill Blannin Collection
Image: No 3 and brake van, ex-DH18, 1994. (Code B96). Bill Blannin Collection
Image: No 3, ex-DH-18, Isis Central Mill. (Code B96). Bill Blannin Collection
Image: No 4, ex-DH69, Isis Central Mill, 1994. (Code B97). Bill Blannin Collection
Image: No 5, Mayne. (Code C4 B). Bill Blannin Collection
Image: No 8, Proserpine Mill. (Code C19 B). Bill Blannin Collection
Image: No 9, Isis Central Mill, 1994. (Code B97). Bill Blannin Collection
Image: Normanby 197. (Code C7). Bill Blannin Collection
Image: Normanby, EXB. (Code C4 B). Bill Blannin Collection
Image: Normanby. (Code C4 B). Bill Blannin Collection
Image: Normanby. (Code C4 B). Bill Blannin Collection
Image: Normanby. (Code C4 B). Bill Blannin Collection
Image: Normanby. (Code C7 B). Bill Blannin Collection
Image: Normanby. (Code C7 B). Bill Blannin Collection
Image: Normanby. (Code C7). Bill Blannin Collection
Image: North Fork, Rosewood. (Code C32 B). Bill Blannin Collection
Image: NSW, Perry (2601.1.51 ex-Marian Mill), Melaleuca Station, Chinderah, 1996. (Code C12 B). Bill Blannin Collection
Image: NSW, Perry (2601.1.51 ex-Marian Mill), Melaleuca Station, Chinderah, 1996. (Code C12 B). Bill Blannin Collection
Image: NSW: 053 5353, Dorrigo, 9/96. (Code C22). Bill Blannin Collection
Image: NSW: 1904, Dorrigo, 9/96. (Code C22). Bill Blannin Collection
Image: NSW: 3801 at water tank, Casino, 1993. (Code B). Bill Blannin Collection
Image: NSW: 3801 on turntable, Casino, 1993. (Code B). Bill Blannin Collection
Image: NSW: 3801 on turntable, Casino, 1993. (Code B). Bill Blannin Collection
Image: NSW: 5920, 6039, Dorrigo, 9/96. (Code C22). Bill Blannin Collection
Image: NSW: 7008, Dorrigo, 1/96. (Code C10). Bill Blannin Collection
Image: NSW: 7008, Dorrigo, 1/96. (Code C10). Bill Blannin Collection
Image: NSW: 7008, Dorrigo, 9/96. (Code C22). Bill Blannin Collection
Image: NSW: Armidale Station, 1/96. (Code C12 E). Bill Blannin Collection
Image: NSW: Avonside No 2, Kitson No 3 (2236 of 1878), Dorrigo, 9/96. (Code C22). Bill Blannin Collection
Image: NSW: Bill Blannin at Kyogle while motorcading 3801 tour to Casino). Bill Blannin Collection
Image: NSW: Byron Bay, 1/96. (Code C11 D). Bill Blannin Collection
Image: NSW: Byron Bay, 1996. (Code C22). Bill Blannin Collection
Image: NSW: Casino, 1993. (Code B). Bill Blannin Collection
Image: NSW: Dorrigo, 1/96. (Code C10). Bill Blannin Collection
Image: NSW: Dorrigo, 1/96. (Code C10). Bill Blannin Collection
Image: NSW: Dorrigo, 1/96. (Code C10). Bill Blannin Collection
Image: NSW: Dorrigo, 1/96. (Code C10). Bill Blannin Collection
Image: NSW: Dorrigo, 1/96. (Code C10). Bill Blannin Collection
Image: NSW: Dorrigo, 1/96. (Code C10). Bill Blannin Collection
Image: NSW: Dorrigo, 1/96. (Code C10). Bill Blannin Collection
Image: NSW: Dorrigo, 1/96. (Code C10). Bill Blannin Collection
Image: NSW: Dorrigo, 1/96. (Code C10). Bill Blannin Collection
Image: NSW: Dorrigo, 9/96. (Code C22). Bill Blannin Collection
Image: NSW: Dorrigo, 9/96. (Code C22). Bill Blannin Collection
Image: NSW: Dorrigo, 9/96. (Code C22). Bill Blannin Collection
Image: NSW: Dorrigo, 9/96. (Code C22). Bill Blannin Collection
Image: NSW: Dorrigo, 9/96. (Code C22). Bill Blannin Collection
Image: NSW: Dorrigo, 9/96. (Code C22). Bill Blannin Collection
Image: NSW: Dorrigo, 9/96. (Code C22). Bill Blannin Collection
Image: NSW: ex-VIC carriages, Melaleuca station, 1994). Bill Blannin Collection
Image: NSW: Macksville, 9/96. (Code C21). Bill Blannin Collection
Image: NSW: Perry 2601-2-51, ex-Marian Mill, Melaleuca, 1994). Bill Blannin Collection
Image: NSW: ROD 20-24, Dorrigo, 9/96. (Code C22). Bill Blannin Collection
Image: NSW: Timbertown, Wauchope. (Code B98). Bill Blannin Collection
Image: NSW: Urunga, 1996. (Code C22 D). Bill Blannin Collection
Image: NSW: Wauchope, 1/96. (Code C10). Bill Blannin Collection
Image: NSW: Wauchope, 1970. (Code C29 B X101). Bill Blannin Collection
Image: NT: Alice Springs [Ghan], 1994. (Code B). Bill Blannin Collection
Image: NT: Alice Springs [Ghan], 1994. (Code B). Bill Blannin Collection
Image: Oakey. (Code C29 B). Bill Blannin Collection
Image: Oakey. (Code C30 B). Bill Blannin Collection
Image: OC1 BP. (Code C32 B). Bill Blannin Collection
Image: OCI, BP/QR, '50 Years', Toowomba. (Code C29 B). Bill Blannin Collection
Image: OLE 16, Ampol, Toowoomba. (Code C29 B). Bill Blannin Collection
Image: Paddock near Toowoomba, 1/96. (Code C9 B). Bill Blannin Collection
Image: PB 732, DH 24, Mary River, 11/4/87. (Code C28 B). Bill Blannin Collection
Image: PB15 444, Redbank Museum. (Code C4 B). Bill Blannin Collection
Image: PB15 448, Swanbank, 1994. (Code B85). Bill Blannin Collection
Image: PB15 548. (Code C4 B). Bill Blannin Collection
Image: PB15 749, Ernest Tunnel, 1963. (Code B). Bill Blannin Collection
Image: Perry, 19. (Code B). Bill Blannin Collection
Image: 'Petrie', Nambour. (Code C30 B). Bill Blannin Collection
Image: Pleystowe No 6. (Code B48). Bill Blannin Collection
Image: Portable Mill No5 Power Unit. (Code C3). Bill Blannin Collection
Image: QFC 34444 with MMB 25 as load, Gympie. (Code C20). Bill Blannin Collection
Image: QLX 37029, Mayne. (Code C7 B). Bill Blannin Collection
Image: QR explosives wagon, EALY 25407, Caboolture, nd. (Code B7). Bill Blannin Collection
Image: QR horse wagon, EWT 9, Mayne, nd. (Code B46). Bill Blannin Collection
Image: QR standard cattle wagon, IC 15088, Normanby, 1977. (Code B38). Bill Blannin Collection
Image: Risk Signal Box. (Code C31 B). Bill Blannin Collection
Image: RM 16, Rockhampton, 1996. (Code B RG). Bill Blannin Collection
Image: RM 1901, Brisbane Valley. (Code C28 B). Bill Blannin Collection
Image: RM 1901, Cecil Plains, 7/88. (Code B25 C). Bill Blannin Collection
Image: RM 1901, Coomeri, 1989. (Code B25 C). Bill Blannin Collection
Image: RM 1901, Cooracook, 25/2/1989. (Code C20). Bill Blannin Collection
Image: RM 1901, Ferndale, 25/2/89. (Code B25 C). Bill Blannin Collection
Image: RM 1901, Millmerran, 7/88. (Code B25 C). Bill Blannin Collection
Image: RM 1901, Millmerrn. (Code C32 B). Bill Blannin Collection
Image: RM 1901, Mount Hallen, 25/2/1989. (Code C20). Bill Blannin Collection
Image: RM 1901, Mt Tyson, 7/88. (Code B25 C). Bill Blannin Collection
Image: RM 1901, Toocoolawah. (Code C32 B). Bill Blannin Collection
Image: RM 2004, RM 20nn, Milmerran, 21/1/84. (Code 310). Bill Blannin Collection
Image: RM 2004, RM 20nn. (Code Wyreema, 21/1/84. (Code 310). Bill Blannin Collection
Image: RM 2024, Millerran, 21/1/84. (Code C31 B). Bill Blannin Collection
Image: RM 2024, Pittsworth, 21/1/84. (Code C31 B). Bill Blannin Collection
Image: RM 2026 + 2038, 19/1/1985. (Code C31 B). Bill Blannin Collection
Image: RM 2028 + 2057, Grandchester, 18/1/86. (Code C31 B). Bill Blannin Collection
Image: RM 55, Rosewood, 9/7/83. (Code C31 B). Bill Blannin Collection
Image: RM1816, Ipswich. (Code B100). Bill Blannin Collection
Image: RM1901, [grain elevators]. (Code C28 B). Bill Blannin Collection
Image: RM2020, Shorncliffe. (Code C29 B). Bill Blannin Collection
Image: RM2024. (Code C29 B). Bill Blannin Collection
Image: Roma Street Tunnel construction, 1995. (Code C6 B). Bill Blannin Collection
Image: Roma Street Tunnel construction, 1995. (Code C6 B). Bill Blannin Collection
Image: Roma Street Tunnel construction, 1995. (Code C6 B). Bill Blannin Collection
Image: Roma Street Tunnel construction, 1995. (Code C6 B). Bill Blannin Collection
Image: Roma Street Tunnel construction, 1995. (Code C6 B). Bill Blannin Collection
Image: Roma Street. (Code C28 B). Bill Blannin Collection
Image: Rosewood. (Code C31 B). Bill Blannin Collection
Image: SA, 400, Peterborough. (Code B100). Bill Blannin Collection
Image: SA, 404, 401, 400, Port Pirie. (Code C3). Bill Blannin Collection
Image: SA: 'Sandfly' (Baldwin 7960 of 1886), Keswick Station, Adelaide). Bill Blannin Collection
Image: Shay, Laheys Canungra, at the tunnel. (Code B92). Bill Blannin Collection
Image: Shay, Laheys Canungra. (Code Ex-Dept Forestry PHO). Bill Blannin Collection
Image: Shay, Mapleton Tramway, 1935. (Code B92). Bill Blannin Collection
Image: Shay, Moreton, Nambour. (Code B100). Bill Blannin Collection
Image: Shorncliffe station. (Code B). Bill Blannin Collection
Image: Shorncliffe. (Code C31 B). Bill Blannin Collection
Image: Sleeping Car 1057, 110/85. (Code C28 B). Bill Blannin Collection
Image: South Australia: 'Sandfly' cab interior (Baldwin 7960 of 1886), Keswick Station, Adelaide). Bill Blannin Collection
Image: South Brisbane [weigh scale and freight shed?]. (Code C30 B). Bill Blannin Collection
Image: South Brisbane, 4' 8 1/2. (Code C32 B). Bill Blannin Collection
Image: South Brisbane. (Code C28 B). Bill Blannin Collection
Image: Stanthorpe Station, 1/96. (Code C8 A). Bill Blannin Collection
Image: Station before restoration, ANGRMS, Woodford, 1996. (Code C21). Bill Blannin Collection
Image: Station, Bundaberg Garden Railway, 1994. (Code B89). Bill Blannin Collection
Image: Sunlander, Albion, 1977. (Code D88). Bill Blannin Collection
Image: Sunlander, Eum Range. (Code C20). Bill Blannin Collection
Image: Sunlander, Petrie. (Code C28 B). Bill Blannin Collection
Image: Swanbank, 1984. (Code B2). Bill Blannin Collection
Image: Swanbank, 1994. (Code B79). Bill Blannin Collection
Image: Swanbank, 1994. (Code B79). Bill Blannin Collection
Image: Swanbank, 1994. (Code B85). Bill Blannin Collection
Image: TAS, 20A, No 12, Rosebery. (Code C2). Bill Blannin Collection
Image: Telegraph Road grade crossing, 1995. (Code C1). Bill Blannin Collection
Image: TES 36323, Mayne. (Code C7 B). Bill Blannin Collection
Image: TES 36338, Mayne. (Code C7 B). Bill Blannin Collection
Image: The Twins [behind farm trailers], River Depot, Moreton Mill, 18/7/96. (Code C17). Bill Blannin Collection
Image: Thulimbah/Stanthorpe, 1/96. (Code C8 A). Bill Blannin Collection
Image: Thulimbah/Stanthorpe, 1/96. (Code C8 A). Bill Blannin Collection
Image: Toowoomba, 21/1/84. (Code 310). Bill Blannin Collection
Image: Toowoomba, 22/9/79. (Code C28 B). Bill Blannin Collection
Image: Toowoomba. (Code B27 B). Bill Blannin Collection
Image: Toowoomba. (Code C29 B). Bill Blannin Collection
Image: Toowoomba. (Code C31 B). Bill Blannin Collection
Image: Toowoomba. (Code C31 B). Bill Blannin Collection
Image: Toowoomba. (Code C31 B). Bill Blannin Collection
Image: Toowoomba. (Code C31 B). Bill Blannin Collection
Image: Toowoomba. (Code C31 B). Bill Blannin Collection
Image: Tunnel 1, Stanthorpe. (Code B). Bill Blannin Collection
Image: Uralla Station, 1/96. (Code C12 E). Bill Blannin Collection
Image: Valdora, Dick Kerr, Moreton Mill. (Code B). Bill Blannin Collection
Image: VAOA 33957, Wallangarra, 1/96. (Code C12 E). Bill Blannin Collection
Image: VAOA, The Summitt, Stanthorpe, 1/96. (Code C8 A). Bill Blannin Collection
Image: VIC, ACL No 2, Evansford. (Code C3). Bill Blannin Collection
Image: VIC, G42, Wimba, 30/06/62. (Code C3). Bill Blannin Collection
Image: VIC: 3801, Seymour, 1973. (Code C30 B). Bill Blannin Collection
Image: VIC: 3801, Tallabrook. (Code C30 B). Bill Blannin Collection
Image: VIC: 3820, SM32, S317, Broadford, 1973. (Code B100). Bill Blannin Collection
Image: VIC: D.3 639, 3820, Seymour. (Code C30 B). Bill Blannin Collection
Image: VIC: J505, Murrayville. (Code C30 B). Bill Blannin Collection
Image: VIC: J541, Caulfield. (Code C30 B). Bill Blannin Collection
Image: VIC: J547 on turntable, Coleraine. (Code C30 B). Bill Blannin Collection
Image: VIC: Puffing Billy, 1995. (Code B). Bill Blannin Collection
Image: VIC: Puffing Billy, 1995. (Code B). Bill Blannin Collection
Image: VIC: Puffing Billy, 1995. (Code B). Bill Blannin Collection
Image: VIC: V-Line, 1996. (Code B). Bill Blannin Collection
Image: VJC 23628 Mayne W Darra & Gaythorne. (Code C4 B). Bill Blannin Collection
Image: VJC 23628, WHO 29604, Mayne. (Code C4 B). Bill Blannin Collection
Image: VJM 22196, Newstead. (Code C27 B). Bill Blannin Collection
Image: WA, M499, Busselton. (Code B100). Bill Blannin Collection
Image: WA, MSN 499, Nannup. (Code C3). Bill Blannin Collection
Image: Wallangarra, Qld, 1/96. (Code C12 E). Bill Blannin Collection
Image: Wallangarra, Qld, 1/96. (Code C12 E). Bill Blannin Collection
Image: Wallangarra, Qld, 1/96. (Code C12 E). Bill Blannin Collection
Image: Wamuran Station, . (Code C5). Bill Blannin Collection
Image: Warwick Yards, 1/96. (Code C8 A). Bill Blannin Collection
Image: Warwick Yards, 1/96. (Code C8 A). Bill Blannin Collection
Image: Wheel shop, Normanby. (Code C7). Bill Blannin Collection
Image: Wheel shop, Normanby. (Code C7). Bill Blannin Collection
Image: Willowburn Station, 1/96. (Code C8 A). Bill Blannin Collection
Image: Woolloongabba turntable. (Code C20). Bill Blannin Collection
Image: Woolloongabba, C20). Bill Blannin Collection
Image: Woolloongabba. (Code C20). Bill Blannin Collection
Image: Woolloongabba. (Code C20). Bill Blannin Collection
Image: XPT, Yerrongpilly. (Code C32 B). Bill Blannin Collection
Image: Yandia [Navvy housing?]. (Code C29 B). Bill Blannin Collection
Image: Yarramain. (Code C32 B). Bill Blannin Collection
Image: Zillemere. (Code C20). Bill Blannin Collection
Copyright © Modelling the Railways of Queensland Convention, Lynn Zelmer or the contributor as appropriate. Last updated: 10 April 2020 [lz]; e-mail: Lynn @ ZelmerOz.com